Vintage theme - editing your menus
From Spiffy Stores Knowledge Base
Revision as of 14:07, 11 November 2013 by Shawn (talk | contribs) (→Editing the menu in your store's footer)
By default, the Vintage theme uses the menu called "Top menu" in your store's header, and the menu called "Footer" in the footer of your store. The theme only utilises 2 menus, so you may as well delete the contents of other menus in the "Store menus" section of your store's Toolbox. This will avoid confusion down the track.
If you're switching to the Vintage theme from another theme, and have all of your menu items in a different menu, you can select the menus that you want to use in your store by going to the "Design & assets -> theme editor" section of your store's Toolbox. There you can select the menu to display in your header in the "Logo and top menu" section, and select your footer menu in the "Store footer" section.

Built-in drop down menus

The Vintage theme supports up to 4 levels of drop-down menus.
There's no mucking about with code to get your drop-down menus working. You can create them simply by following the simple steps below. One important note though... you can't create links to nothing! If you haven't created the page or collection you want to link to, you need to create them first.
First item
- Log in to your store's Toolbox and go to the "Store menus" tab
- Scroll down to the "Top Menu" section, and click "Add new Menu Item"
- Type in the name of your menu item
- Select whether you want your menu item to link to a page, product, or collection
- A new list of options will appear. Select the name of your page that you want to link to.
- Click the "Add menu item" button to save.
Creating a drop-down menu

Sub item
- Create another menu item the same way you created one above
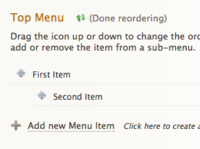
- Click the "Reorder" link
- Click and drag the item you want to drop down to the right (so it sits directly underneath and to the right of the one above - see example)
- Click "Done reordering"
Previewing your store should show your second item as a drop-down. You can do this with multiple levels, and re-arrange your menus by dragging items up, down, left, or right whilst you're in "re-order" mode.
Your store's footer contains a single level menu. You can't create drop-down menus in your footer. Items created as sub-items will also just disappear, so make sure that your footer menu is all on one single level. To add an item to the menu in your footer, follow the instructions below;
- Log in to your store's Toolbox and go to the "Store menus" tab
- Scroll down to the "Footer" section, and click "Add new Menu Item"
- Type in the name of your menu item
- Select whether you want your menu item to link to a page, product, or collection
- A new list of options will appear. Select the name of your page that you want to link to.
- Click the "Add menu item" button to save.
Related pages
- The Vintage theme guide
- Vintage theme features
- Frequently asked questions
- Uploading your logo
- Selecting & modifying your colour scheme
- Selecting your title font
- Editing your store's menus
- Updating your home page
- Editing your slideshow
- Adding featured collections to your home page
- Adding featured collections on other pages
- Connecting your email subscriber form
- Enabling Facebook comments
- Connecting to your social media accounts (Facebook, Twitter, Google + etc.)
- Displaying icons for your accepted payment methods